Parent zone designs
The problem
After the first booking, the parent zone is the page parents use most. They check when the next session is, say a child can't come, book a make-up, pay an instalment, or download a document. It has to feel like part of your website, work on a phone, and show the logged-in parent everywhere on the site, not only on that one page.
What you'd have to build yourself
Login without passwords, family accounts with several children, bookings, cancellations within your deadlines, make-ups, payment plans and receipts, documents, plus all the emails around them. The Zooza profile widget does all of it. You decide how it looks and where it sits.
The embed
The same two lines for every variant below:
<div data-zooza-widget="profile" data-zooza-id="YOUR_API_KEY"></div>
<script async src="https://api.zooza.app/widgets/v1/loader.js"></script>
Set the page address in Publish > Widget > Profile > URL, so the emails and the other widgets link parents back to it. Everything else is design.
Variant A: playful dashboard page
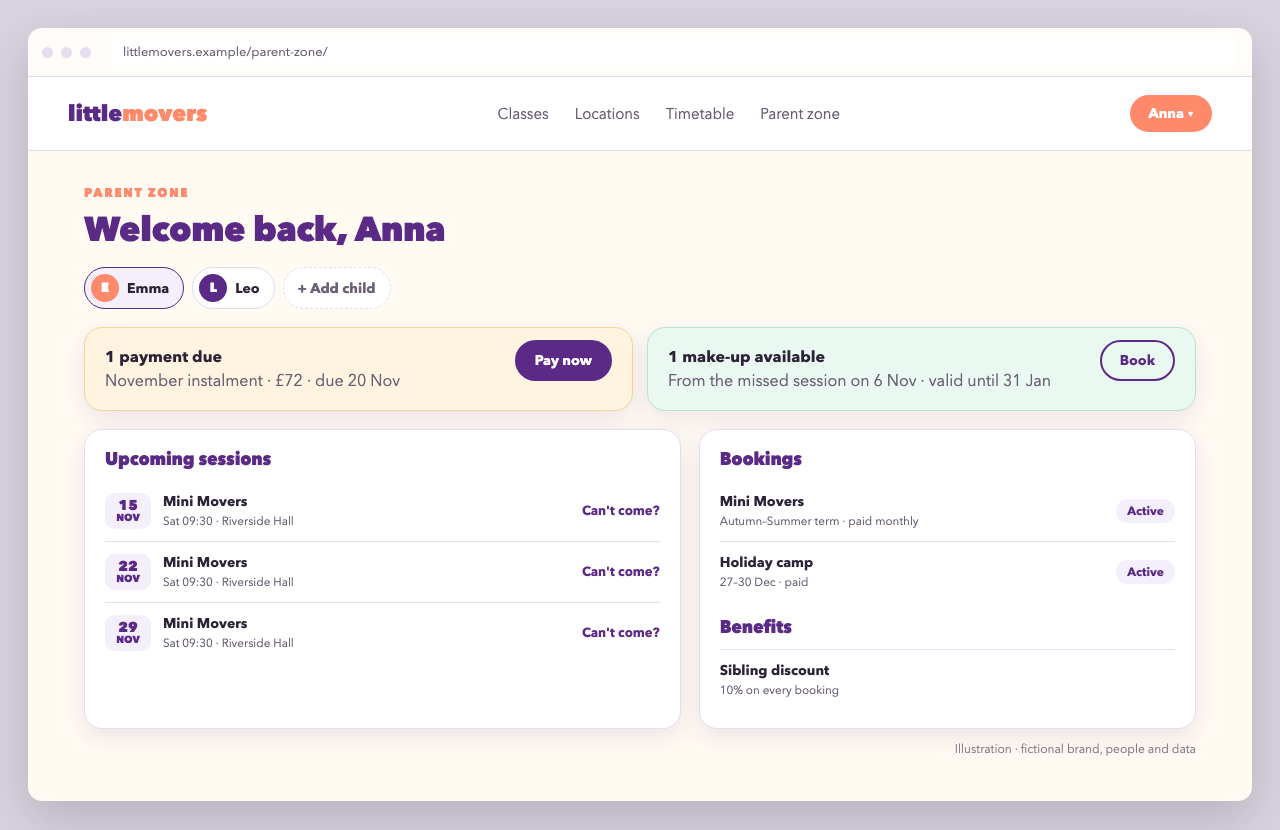
A full-width page that matches a colourful brand: big welcome heading, rounded cards, soft shadows. The child switcher, alerts (payment due, make-up available), upcoming sessions and bookings all come from the widget. Only the heading above it is your own HTML.
<section class="lm-parent-zone">
  <p class="lm-eyebrow">Parent zone</p>
  <h1>Your classes</h1>
  <div data-zooza-widget="profile" data-zooza-id="YOUR_API_KEY"></div>
</section>
.lm-parent-zone { max-width: 1100px; margin: 0 auto; padding: 2rem 1.5rem 4rem; }

/* Theme the widget's dashboard */
.lm-parent-zone div.zooza {
  --z2-bg: transparent;
  --z2-surface: #ffffff;
  --z2-text: #2d2338;
  --z2-border: #e6dcef;
  --z2-border-soft: #f1eaf7;
  --z2-radius: 18px;
  --z2-gap: 16px;
  --z2-pad: 18px;
  --z2-shadow: 0 8px 24px rgba(91, 42, 134, 0.10);
  --z2-warn-bg: #fff4e0;   --z2-warn-border: #f3d39a;
  --z2-ok-bg: #e9f8f0;     --z2-ok-border: #b7e4cb;
  --z2-badge-bg: #f5eefb;  --z2-badge-border: #e6dcef;
}
Variant B: minimal account area with a header menu
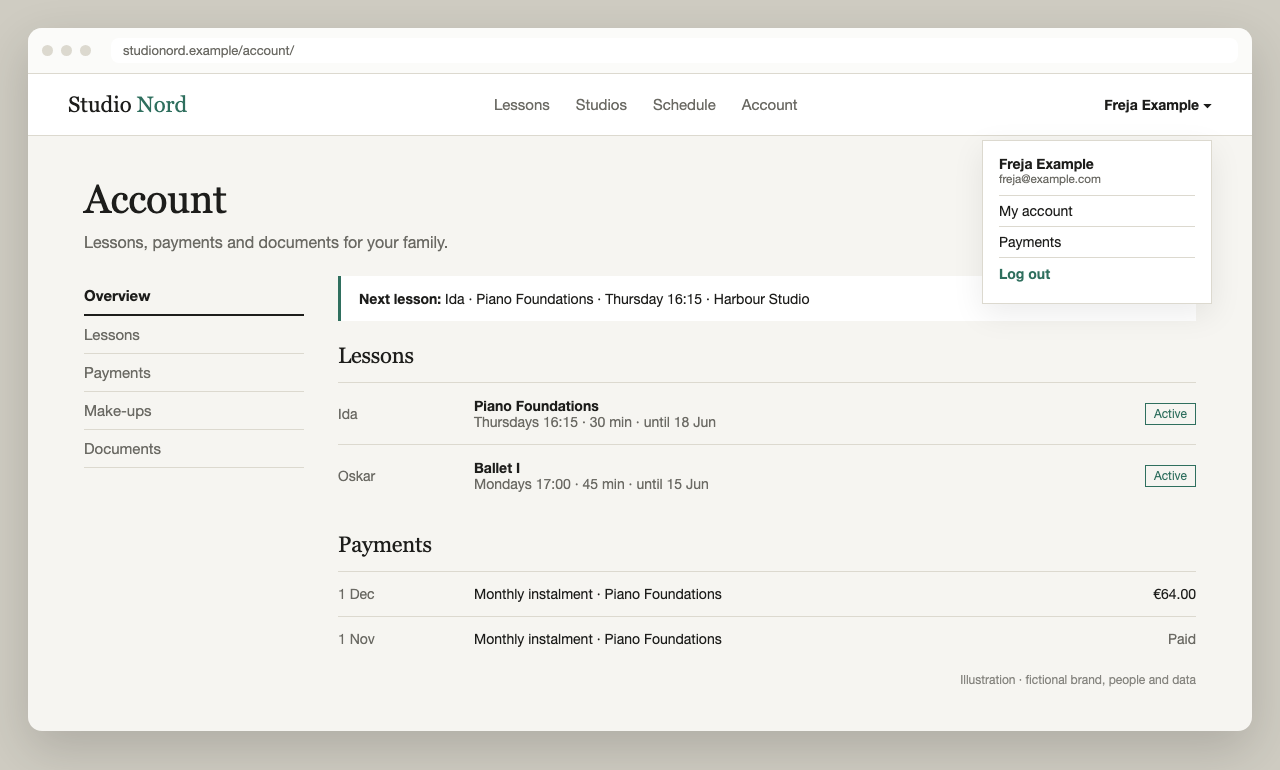
A calm, editorial look: no shadows, square corners, hairline borders. The parent's name stays in the site header on every page, with a Log out link, using the widget's login events.
.nord-account div.zooza {
  --z2-bg: transparent;
  --z2-surface: transparent;
  --z2-border: #dcd9cf;
  --z2-border-soft: #dcd9cf;
  --z2-shadow: none;
  --z2-radius: 0;
  --z2-gap: 0;
  --z2-pad: 14px;
  --z2-badge-bg: transparent;
  --z2-badge-border: #2f6f5e;
}
The header menu works on any page of the site, even where the widget isn't embedded:
<div class="nord-user" hidden>
  <button type="button" class="nord-user__name"></button>
  <div class="nord-user__menu">
    <a href="/account/">My account</a>
    <a href="#" class="nord-user__logout">Log out</a>
  </div>
</div>

<script>
  ( function () {
    var box = document.querySelector( '.nord-user' );
    if ( ! box ) return;

    function show( user ) {
      if ( ! user || ! user.first_name ) { box.hidden = true; return; }
      box.querySelector( '.nord-user__name' ).textContent = user.first_name + ' ' + ( user.last_name || '' );
      box.hidden = false;
    }

    // Logged in earlier (any page): the widget keeps the user in localStorage
    try { show( JSON.parse( localStorage.getItem( 'zooza_user' ) || 'null' ) ); } catch ( e ) {}

    document.addEventListener( 'zooza_user_logged_in', function ( e ) { show( e.detail ); } );
    document.addEventListener( 'zooza_user_logged_out', function () { show( null ); } );

    box.querySelector( '.nord-user__logout' ).addEventListener( 'click', function ( e ) {
      e.preventDefault();
      document.dispatchEvent( new CustomEvent( 'zooza_user_force_logout', {
        detail: { redirect_url: 'https://studionord.example/' },
      } ) );
    } );
  } )();
</script>
The page around the widget (the sidebar with Overview, Lessons, Payments and so on) is your own navigation. Point its links to sections of your site, or keep a single account page and use the sidebar for help, contact and FAQs.
Variant C: mobile first
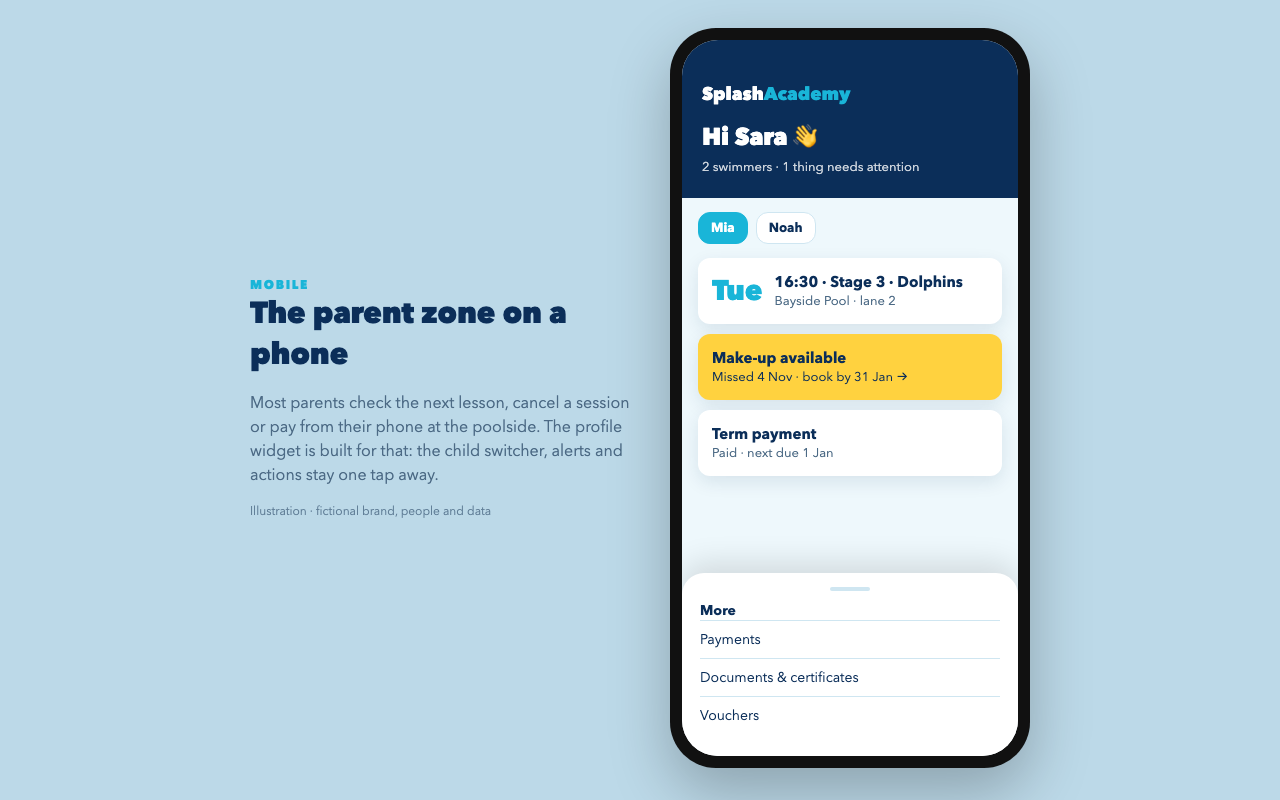
Parents of swimmers check the app at the poolside, on a phone. Give the widget the full width on small screens, use larger touch targets, and let one bold colour carry the brand.
.splash-account div.zooza {
  --z2-bg: #eef8fc;
  --z2-surface: #ffffff;
  --z2-text: #0b2e59;
  --z2-border: #cfe6f1;
  --z2-radius: 12px;
  --z2-radius-sheet: 22px;
  --z2-pad: 14px;
  --z2-ok-bg: #fff4c2;     --z2-ok-border: #ffd23f;
  --z2-overlay: rgba(11, 46, 89, 0.55);
}

@media (max-width: 640px) {
  /* Edge to edge on phones: drop your page's side padding around the widget */
  .splash-account { padding-left: 0; padding-right: 0; }
  .splash-account div.zooza { --z2-gap: 12px; }
}
Tips for every variant
- Put the profile on one page and set that page's URL in the widget settings. The registration and checkout widgets, and Zooza's emails, send parents there.
- Link to it from your main navigation ("Parent zone", "My account"). Returning parents look for it in the header.
- Use the variables first. They cover colours, borders, corners, spacing and the alert colours. Use other CSS rules only for details the variables don't reach, and expect to revisit those after widget updates.
- Pair it with your chatbot: the AI chatbot example uses the same login events to greet the logged-in parent.